A couple friends recently started playing X-Wing miniatures, so I’ve put together here some links I’ve found useful and a few of my ideas toward constructing your first full squads beyond the introductory scenarios and ships in the core sets. This post is not a comprehensive guide to getting started in the game. As you might guess for a well designed Star Wars game featuring cool little models, there is A TON of blogs, forums, etc., out there. Searching around will quickly yield lots of good stuff, including many detailed beginner’s tutorials. My intent here is just to provide links to a few tools and some ideas to keep in mind putting together your first standard 100pt dogfight squad, including an introduction to some very simple quantitative analysis supporting them.
Along the way I also develop a solid, quantitatively supported argument that my Bey’s Bees squadron is very similar to but might work better for many fellow B-Wing aficionados than the frequently suggested BBBB and BBBBZ formulas.
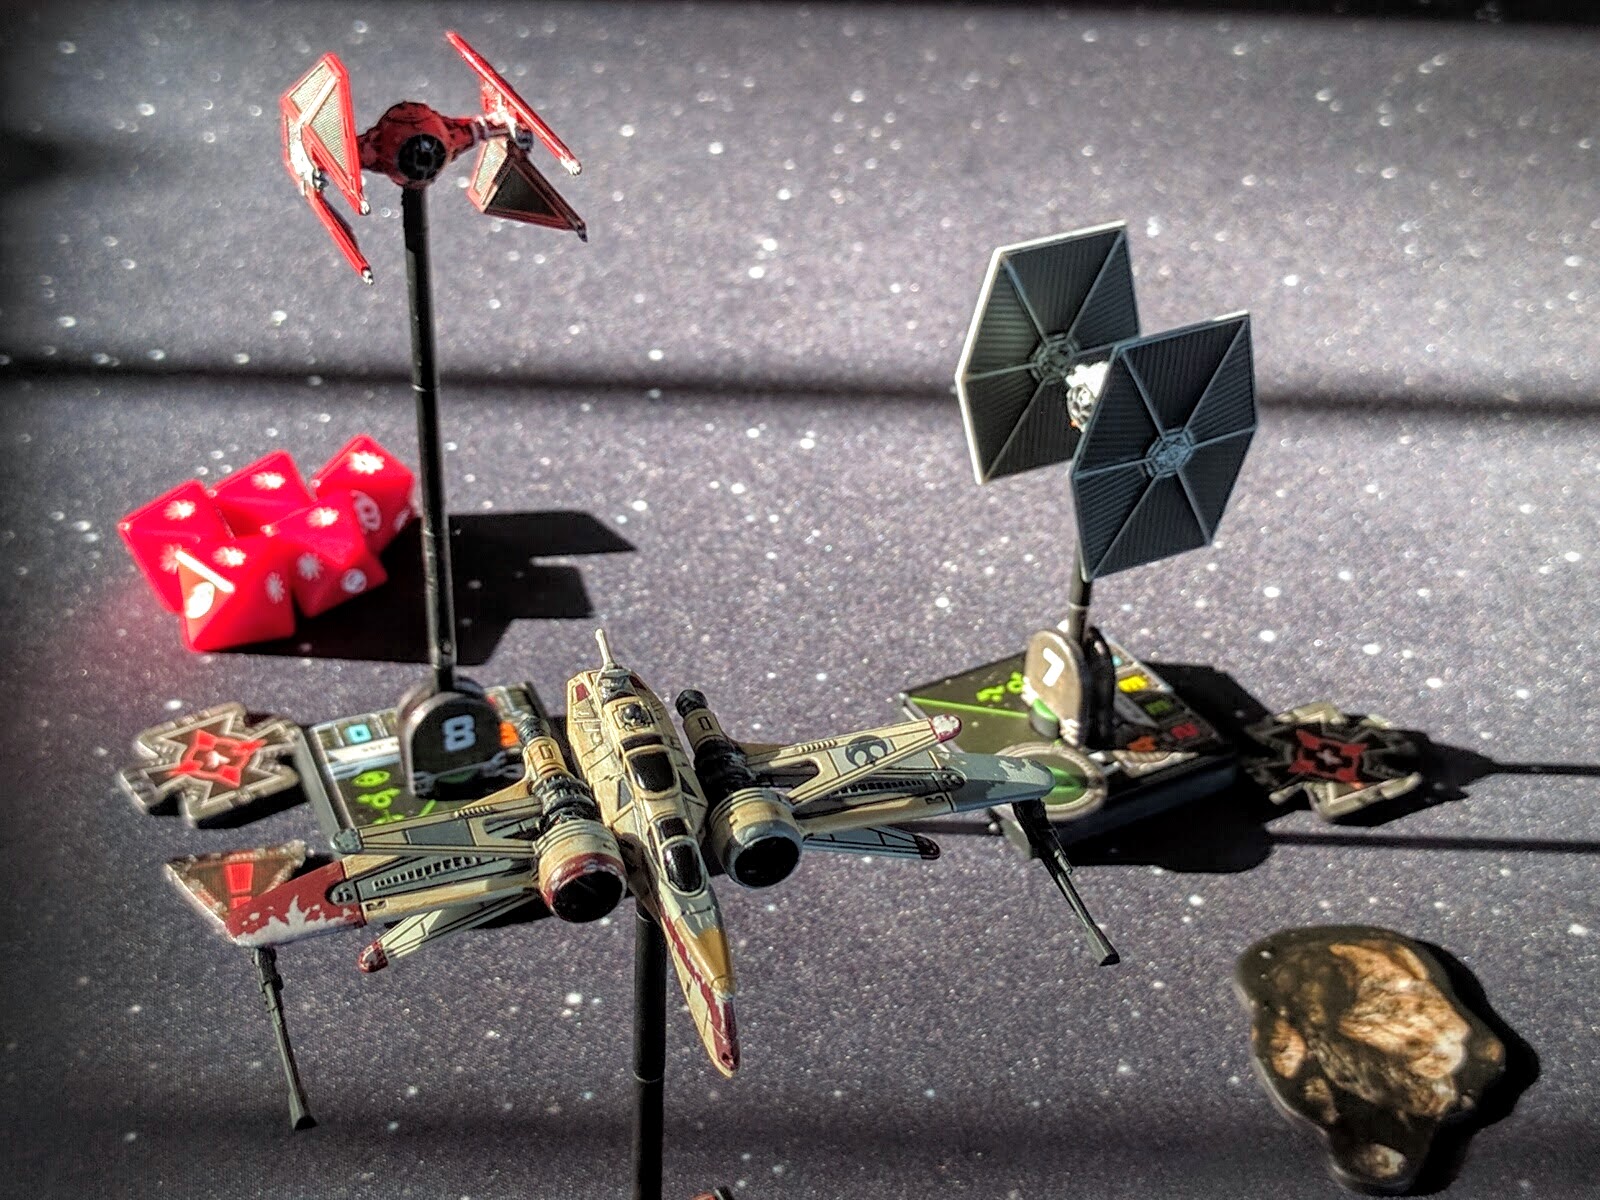
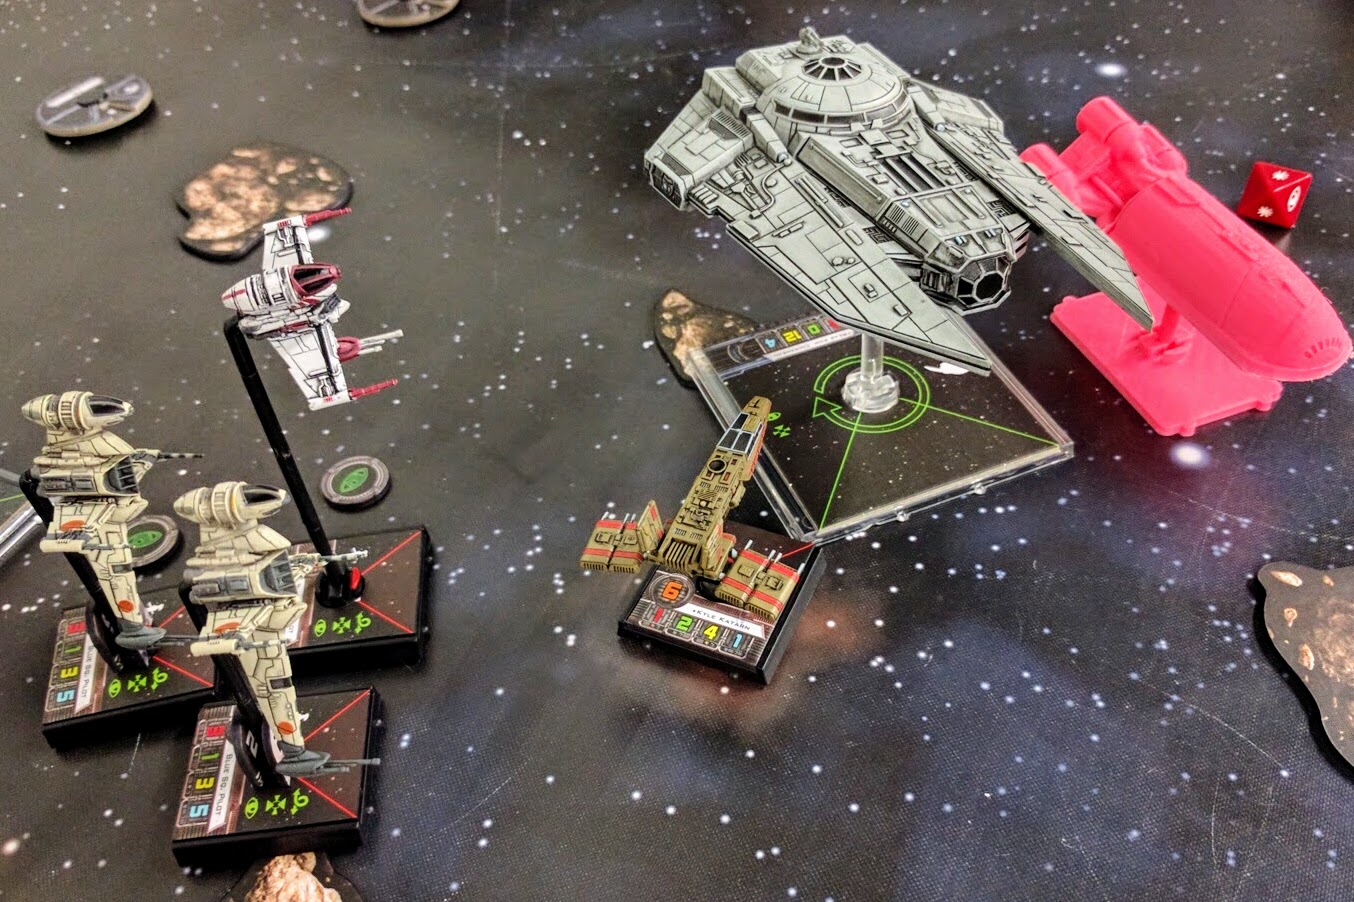
Shara Bey’s ARC-170 tailgunner fights to keep off Carnor Jax in his TIE Interceptor.
Research
Many resources exist for looking up cards, but the X-Wing Wikia is my go-to. It has too many ads on mobile or without an ad blocker, but is otherwise very good. If you want to know what a card does, Google “x-wing [card name],” go to the Wikia link, and you’ll get the details. It has info on every ship & card in the game, and many pages have extensive threads discussing how cards work as well as strategies for their use.
Fab’s Squadron Generator has a page that I personally find unfortunately hard to read for the details (hover over the card names for info), but it is a good visual overview of every product in the game.
For every expansion that comes out, Fantasy Flight publishes a preview article that generally does a good job explaining the main features of that ship or set, the new capabilities it brings, and why they’re interesting. So looking back through these archives can help understand what role particular ships are supposed to have. You can find these linked from the product pages on their site. If you search for “Fantasy Flight Turn Zero,” they’ve also published several good articles by a 3-time world champion covering some fundamental ideas of basic tactics and strategies in the game.
Building
There are a whole bunch of online X-Wing squad building tools, making it faster & less error prone to construct and think about lists. I personally prefer Voidstate’s app. It has a nice & attractive user interface, presents all the ship & card details nicely, and includes useful tools to track your collection and highlight the ships & upgrades you already own when making choices. One clear downside though is that it’s not usable on phones; the mobile-compatible version only supports browsing previously made lists. If that matters to you, many other options can be found by Googling around. I’m not personally a huge fan of it—though it’s certainly functional—but the app by geordanr is the squad builder I probably see linked most often in discussions on Reddit.
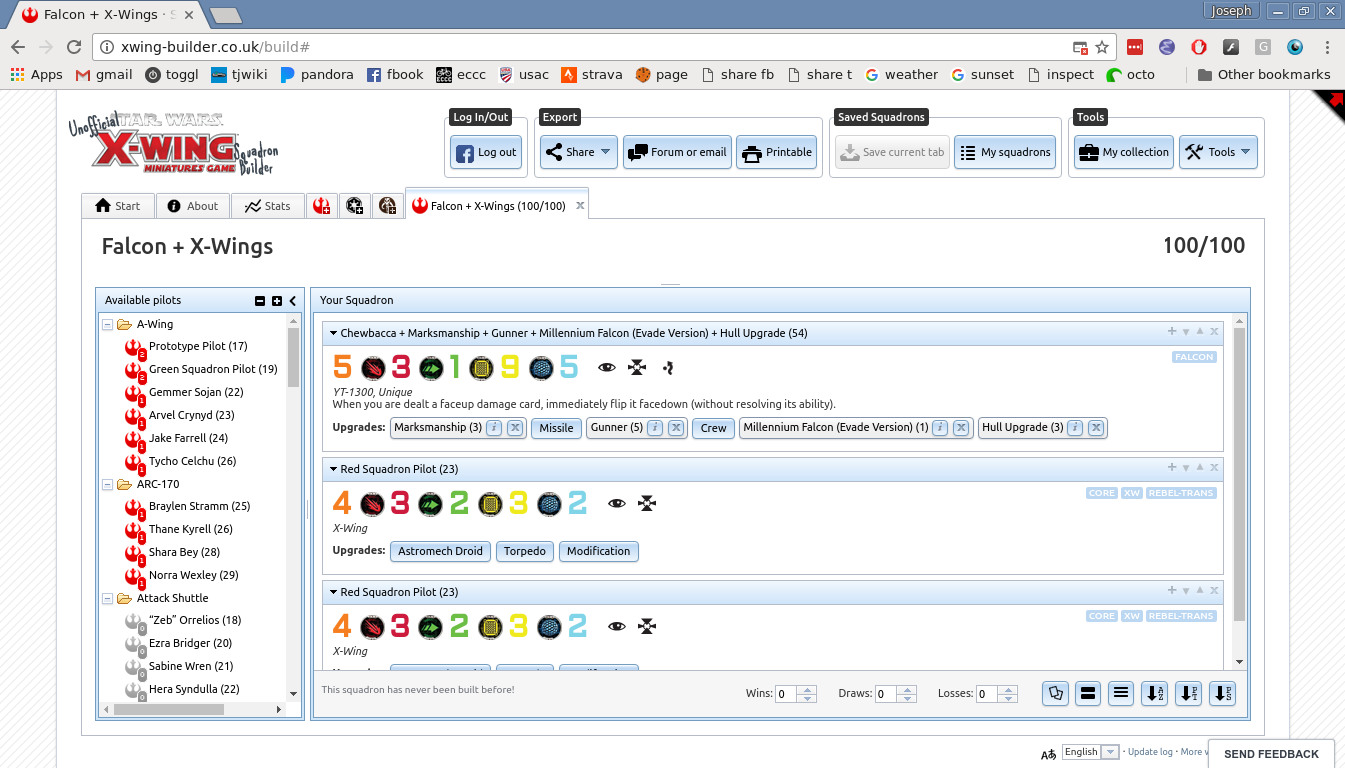
Voidstate’s squad builder.
Design
My battle report from my local shop’s tournament this past August talks a bunch about my usual personal approach to designing and evaluating squadrons that I intend to be somewhat more competition-oriented (though my focus even then is flying what I will enjoy rather than purely what I think will win the most). The battle report from my first tournament, last holiday season, also talks a bit about list design for beginners as well as being a bit of an introduction to what a tournament is like.
I place a lot of emphasis in squad design on simplicity and robustness, which I argue is a good mindset for many beginners, following a simple 4 point rubric:
- Durability: Does the squad have a bunch of shields & hull points so you don’t have to fly perfect and never get tagged? High agility (green numbers/dice) can take the place of that to a large extent, but is of course more of a gamble on the dice rolls. In contrast to both, a different paradigm is to simply not get attacked in the first place. Beyond just good flying, squads can be built to offer more maneuvering options and emphasize tactics like “arc dodging” out of the way of incoming fire. This approach is very viable, but takes more practice & flying skill. Another common style is regenerating damage, e.g., using R2-D2. This also though can require effectively using various abilities and flying in certain styles. Especially for beginner flying, sometimes it’s just nice to have a lot of hull points that you can count on without requiring specific actions or maneuvering.
- Firepower: Does the squad have a bucketful of straightforward shooting from high attack stats (red numbers/dice)? Many effective squads use upgrades and special actions to add attack dice. Another approach is to maximize the reliability of your shots, as opposed to simply taking more shots—two guaranteed hits is better than three possible hits. But both of those approaches tend to eat into your squad points and usually require more skill to enact the appropriate actions at the best times or steer the game toward optimal conditions for your effects. There’s something to be said for just having a bunch of baseline attacks.
- Ships: Does the squad have enough ships to have options and robustness, but not so many as to need fancy precision flying in formation? This basically means having 3 or 4 ships. There are many very powerful 2-ship squads out there, and some I would consider possibly appropriate for beginners by their simplicity. But generally speaking, more ships gives you more options, and provides some tolerance to not getting them all on target at once or even losing a ship or two. More ships also generally means simpler ships, whereas 2-ship builds are often kitted out with suites of complex capabilities and effects. That said, at the opposite end of the spectrum, at six ships or more you’re usually looking at a swarm of relatively weak ships that need to fly in a coordinated fashion and often must hit the same target all at once to be successful. That requires more skill, and successful flying in tight formation takes substantial practice. Stepping down from that, five ships might be workable if they don’t all need to fly very closely. With three or four though they can definitely fly reasonably close enough to support each other, but loose enough to not require skills like judging template distances and angles with high precision, and lots of formation flying experience.
- One Trick: Does the squad have a single, simple special ability to augment the squadron’s basic durability and firepower? If your squad relies on utilizing a whole bunch of different actions and special effects, then there will be a lot simply to remember to use, let alone be able to use well and synergistically. So minimizing the number of tricks needed to make your squad work well reduces the opportunities to make basic mistakes or play suboptimally. Note that this is not as straightforward as just having one special attack or something like that. The core goal here is minimizing the conscious decisions you need to make, and especially the activation actions you need to take. Purely reactive effects or always-on buffs entail less cognitive load and fewer special trigger conditions, so you can discount them a little bit in terms of gauging the complexity of your list. A good example is my August list: The “one trick” is simply that the HWK-290 flies around near the B-Wing formation handing out a focus token at the start of each combat. But that one very simple idea is constructed via a loadout of 4 specific cards to build a focus pool, share it, and let the HWK itself draw on that pool to shoot better (as opposed to, say, also needing target locks to use its secondary).
Clearly this rubric is just one way to think about squad design, and it tends to encourage specific kinds of builds (more on one of those archetypes follows below). Many other approaches are certainly viable and perhaps even better. But I think this is a good, simple framework for beginners setting about constructing their first lists. Too many people get hooked too early on developing overly elaborate lists leveraging many special rules that ultimately wind up being overwhelming for them to actually execute well, prove too brittle once actual enemy contact is made, and so on.
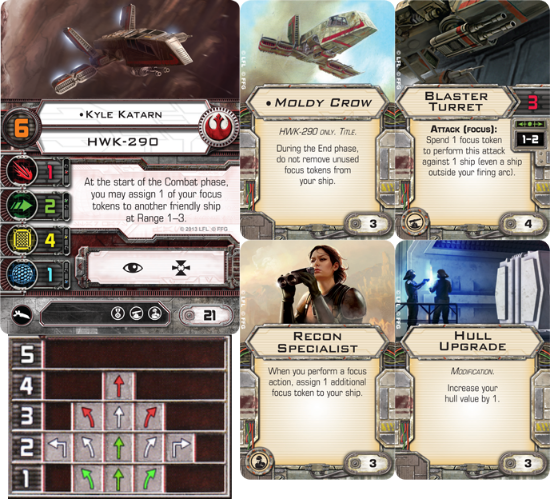
Ship build enabling “one trick”: Passing focus tokens around.
Acquisition
For whatever they’re worth, the following are thoughts on growing from a Force Awakens (blue) core set to some very initial 100pt standard dogfighting lists. They follow the squad design philosophy above and keep the monetary investment low until you know what faction, tactical style, etc. you want to focus on. I don’t assert that these are super “competitive” lists, but I think they’ll perform credibly enough for casual gaming, and should be fun to fly while you learn various mechanics and figure out which aspects of the game you like most and are your strengths & weaknesses.
Rebels
To fly for the treacherous Resistance/Rebellion, again starting from a Force Awakens (blue) core set, I would grab a Heroes of the Resistance expansion first. That is, if you can find one. It just came out recently, sold out almost immediately in most locations, and may not be restocked by many retailers for some time. Don’t buy any of the offerings on eBay, Amazon, etc., marked up to $55 or even $60+; it’s a $40 set. If you can grab one though, in it is a YT-1300 (the Millenium Falcon), a T-70 X-Wing (in Poe Dameron’s colors), and a slew of pilots and upgrades so that you can play around with various special rules. Two X-Wings and a YT-1300 are a reasonable starting squad with solid durability, firepower, and simplicity, so this is a good cost effective option.
If you can’t wait until the Heroes set becomes more easily available again, it would not be crazy to instead buy a second Force Awakens core set. Frequently on sale for $24 or less, that’s pretty reasonable for another X-Wing and additional dice (it will be frequently convenient to have more than 3). Separately those alone cost $23, but the core set also gets you two more TIE/fo Fighters and a spare set of templates and cards. To the two X-Wings you can then add an original trilogy YT-1300/Millenium Falcon, which is now discounted in many places because of the Heroes box and its new trilogy update. The pilots and upgrades in the older expansion though are still useful and have their place in the game alongside the Force Awakens stars. A starter list I’d consider is:
- Chewbacca’s Rookies
- YT-1300: Chewbacca (original trilogy) w/ Draw Their Fire, Gunner, Engine Upgrade
- T-70 X-Wing: Blue Squadron Novice
- T-70 X-Wing: Blue Squadron Novice
The “one trick” here is that Chewbacca takes critical hits merely as facedown damage and has a good amount of shields and hull, so he can relatively safely use Draw Their Fire to absorb critical hits on the X-Wings that might otherwise kill or cripple them. Alternatively, if you find yourself not using that ability much, you can go even simpler by swapping out Draw Their Fire for Veteran Instincts, which will enable Chewie to shoot before mid-skill pilots, though still not before any true aces.
Either way, the real core element of this list is simply that all 3 ships are fairly fast & maneuverable due to their solid dials combined with boost actions. The YT-1300 especially is super maneuverable with its 1-hard turns and very fast due to being a large ship (the larger base means they necessarily move faster for any given template length). It has a strong weapon mounted as a turret so you don’t have to chase targets into arc, and then Gunner makes it fairly reliable. Gunner is not included in the core or YT-1300 box, but earlier in 2016 a version of it with alternate artwork was featured as a top half/participation prize in FFG’s official tournament packs, as well as coming in two popular sets (Slave-1/Firespray 31 and YT-2400), so many people have multiples of it and will be more than happy to just give a new player one of their copies.
An alternative would be two X-Wings and a YT-2400, which is similar to the Falcon but has some unique, strong pilots, such as Dash Rendar who is quite popular for his ability to ignore obstacles (asteroids and debris fields) during his activation (moving & action).
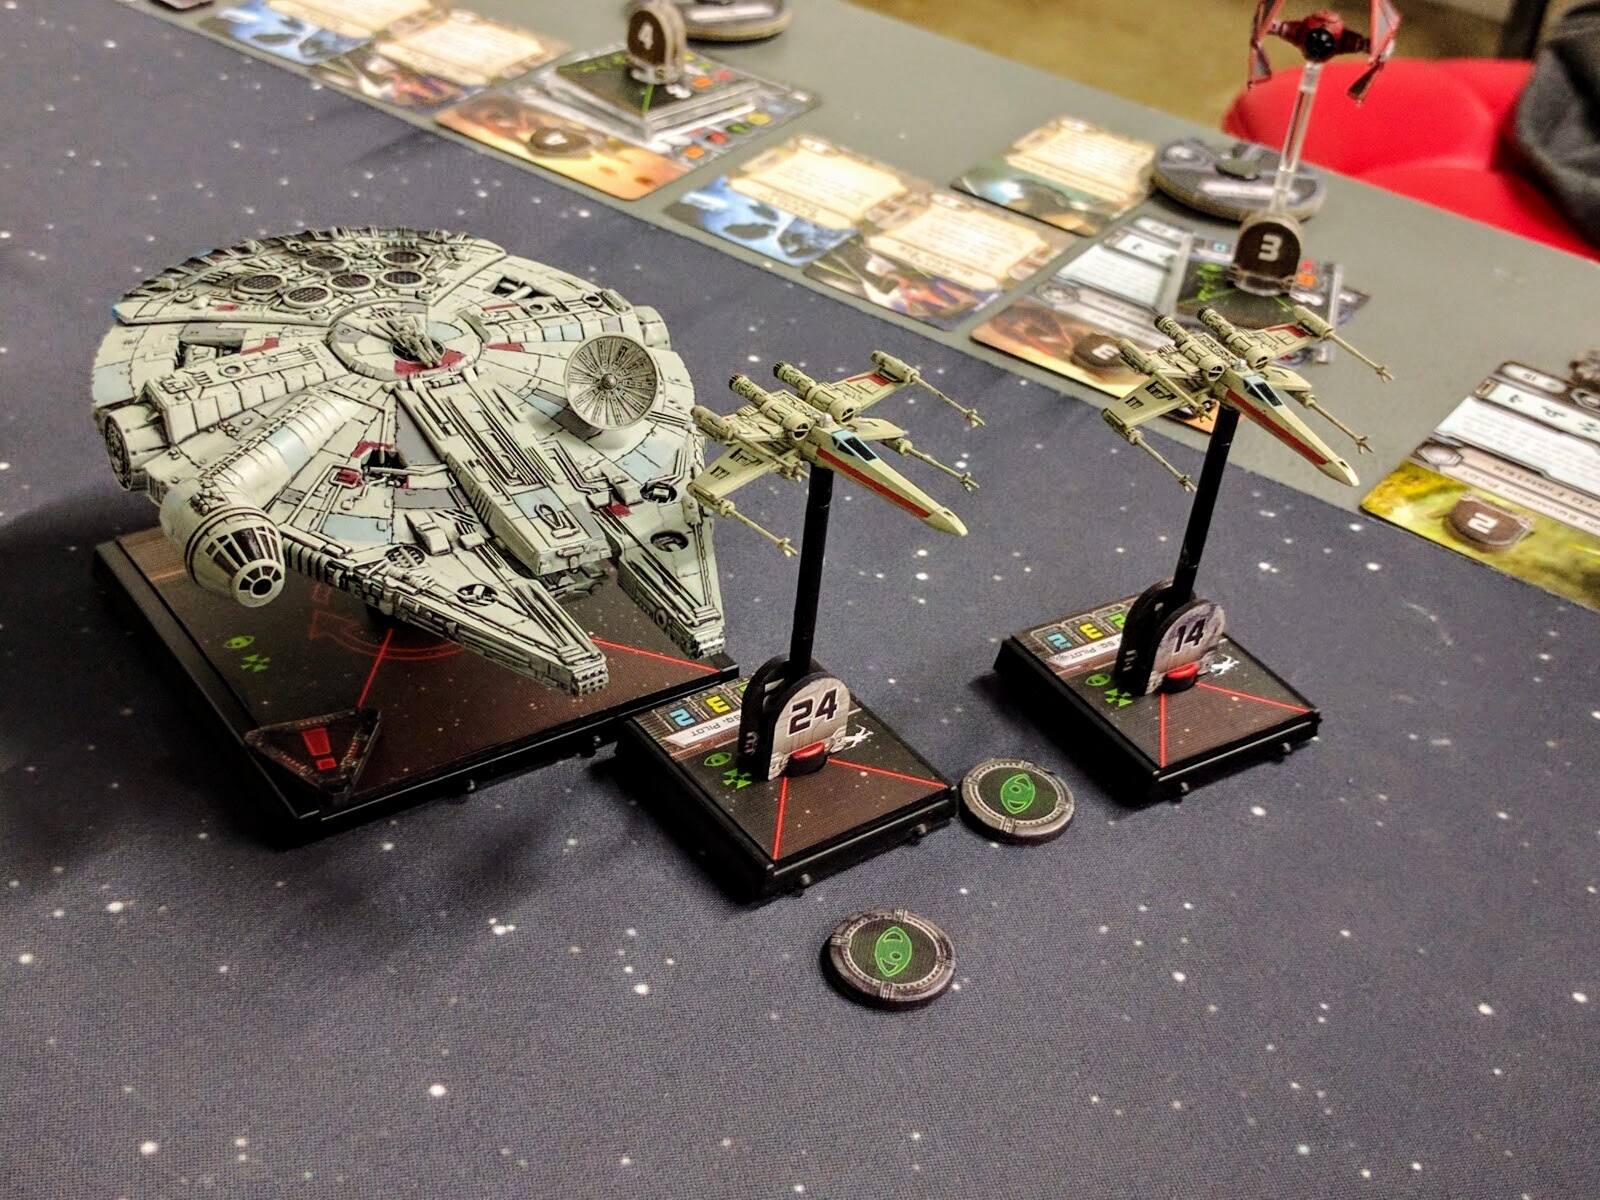
A pair of original trilogy X-Wings and Chewbacca patrol the outer rim.
Imperials
On the honorable First Order/Imperial side, I would pick up another TIE/fo Fighter from the blister pack or, more efficiently, a second core set on sale, and then a VT-49 Decimator. Then you could run a starter list like:
- Decimator Epsilon Patrol
- VT-49 Decimator: Commander Kenkirk w/ Ysanne Isard, Fleet Officer
- TIE/fo Fighter: Epsilon Leader
- TIE/fo Fighter: Epsilon Squadron Pilot
- TIE/fo Fighter: Epsilon Squadron Pilot
You might notice a pattern at this point. Large ships like the YT-1300 (the Falcon) and VT-49 Decimator tend to be durable, pack some firepower, often have a built-in turret so you don’t have to worry about your firing arc, and productively consume a fair amount of squad points such that the list stays simple. One large ship anchoring the squad in either an aggressive or a support role and several small ships escorting it is thus a primary squad archetype entailed by the durability & simplicity rubric above.
In this specific list, the Kenkirk pilot and Isard crew are both attempting to mitigate the major vulnerability of the Decimator: It has no baseline agility, every hit does damage.
The “one trick” though is that the TIE/fo Fighters can make their K-turn and S-loop red moves with relative impunity, provided they stick in reasonably close but not too tight proximity and the Decimator supports them nearby. Its turret weapon makes that easier by obviating the large ship’s need to fly in perfect lockstep.
The trick works as follows. The Epsilon Squadron Pilots activate first, making red moves and thus taking stress and losing their actions. Kenkirk and Epsilon Leader are both pilot skill 6 so it’s your choice which order they activate; it doesn’t matter in general for this trick so it’s up to tactical contingencies like making ranges work or having a clear path. Say Epsilon Leader goes first and also makes a red move and thus takes a stress and loses its action. Now Kenkirk activates. The Decimator moves and then uses the Fleet Officer’s action to give two of the TIE/fo Fighters a focus token in return for taking a stress itself. Those focus tokens though will go a long way to negating the TIEs’ penalty for having made a red move and losing their own actions.
Then, at the start of combat, Epsilon Leader clears the stress of every nearby friendly ship. Note that this includes itself, as the card doesn’t restrict the effect to “other” ships at Range 1 (this is a well understood and FAQ’d card text convention). So, if each ship has stayed in reasonable proximity then all of the TIEs made a red maneuver, two of them still have focus tokens anyway, and nobody has stress that would limit their maneuvers next turn. Interactions among a couple cards have created a useful support buff for the whole squad that doesn’t require a ton of skill to apply, just flying in loose proximity and using Fleet Officer, enabling the attack ships to K-turn and S-loop back and forth strafing a hapless opponent. At least, so goes the theory!
A Decimator shields a VIP Shuttle from Rebel scum attackers.
Instead of the Decimator, a more traditional and nostalgic ship filling a similar large ship role would be the Slave-1/Firespray 31. That’s a valid option, but I think the Decimator is a better bet for beginners. The Firespray doesn’t have a primary turret, just front+rear arcs, so it takes a little more skill to bring to bear. More importantly though, the box set doesn’t include a way for it to buff other ships and thus fill a support role amplifying the entire squad like the Fleet Officer that comes in the Decimator box does (N.B. that cards aren’t limited to the ship they came with, so this is just a concern about efficient purchasing rather than an inability to put the F.O or other cards on the Slave-1 at all). Buffing several ships is usually a better bet than simple attacks in terms of efficiency in effect versus points.
Somewhat similarly, the Lambda Shuttle is a classic Star Wars ship, beautiful model, and there are many powerful squads built around it. But its very limited maneuver dial tends to require more skill to fly well, and most popular lists using it are built around other more exotic ships and cards, most notably Emperor Palpatine, who only comes in the Imperial Raider huge ship for “epic,” an official X-Wing variant for large battles.
Alternatively, and perhaps cheapest given that they’re often on sale, you could pick up a second Force Awakens core set and fly four TIE/fo Fighters with various pilots and upgrades. The big downside as a new pilot is that to be effective it would place even more emphasis on coordinated flying, and on utilizing several different special abilities. Not insurmountably complex, but more so than a “big ship turret” squad.
Another possibility would be to pick up another TIE/fo Fighter from either the blister or core set and then the new-ish Imperial Veterans box. You could then run a group of three or four TIE/fo Fighters supported by either a TIE Defender or TIE Bomber. Note that the Imperial Veterans box contains several cards for the latter ships that make them more powerful or efficient than those ships are in their individual blisters. If you kept the TIE/fo group fairly simple then this might still be a manageable level of complexity for a new pilot, with the “one trick” being the Defender’s maneuvering tricks or the Bomber’s munitions. I’m not convinced this would be a particularly durable list, but the Imperial Veterans set and especially the Defender pilots and titles therein are the basis of a number of competitive Imperial lists you could consider later on.
Analysis
After writing all of the above, I started to think about simple concrete measures of durability and firepower to quantify those aspects of my rubric and make them more objective. Off the cuff, the measure and metric I settled on was that a combined total of 22 hull points and shields across a squad probably reflected a threshold for what I would consider “durable,” and 10 total attacks the threshold for high baseline firepower. Total agility is more complicated to factor into durability, but also worth keeping in mind in evaluating the expected basic longevity of a squadron.
So then I calculated the numbers for the lists here and a couple others:
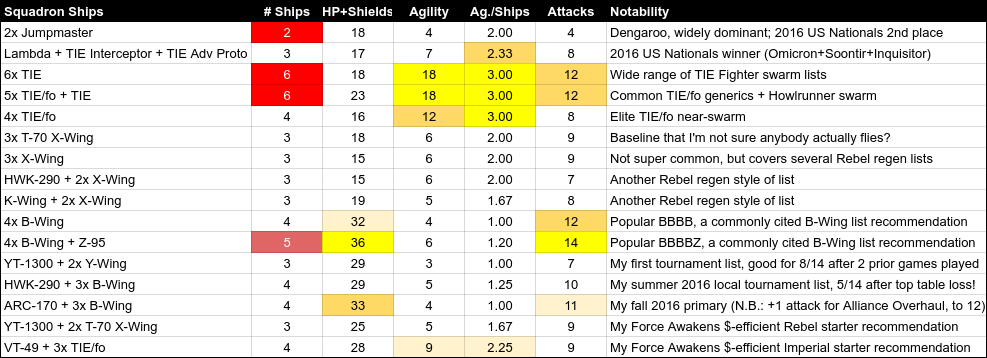
This sampling lines up with and confirms my off-the-cuff threshold estimates: At 22 hull+shields a squad is about halfway between durable lists able to just absorb a lot of damage, and squads that rely on other techniques such as avoiding or regenerating damage. Meanwhile, 10 attacks is just above where many squads fall and thus could be considered the start of heavy baseline firepower.
At first glance the data also seems to yield a threshold number for high defense, which is a kind of durability, at 6 agility. That’s useful, however, as agility is about individual ships being attacked rather than how much damage the squad as a whole can absorb or put out, I think it’s important to normalize for the number of ships. That gives us a simple computed measure, agility divided by ship count, i.e., average agility. Those numbers are naturally much closer, but there’s a clear metric that confirms intuition: Having 3 agility per ship is good, 2 is average, and 1 is inferior for built-in defense.
Overall I think these are some very simple but useful quantitative measures and metrics to consider in evaluating potential lists. The table also supports the squad design rubric above as a guide to building a kind of list that I think is beginner friendly and should be credible, though not necessarily super powerful.
Net Lists
For example, these simple measures and metrics make it obvious that the widely dominant Dengaroo list variations (2x Jumpmasters) are not succeeding on their baseline stats: They’re at or near the bottom in each stat. Clearly the roughly dozen cards building common versions of that 2-ship squad and the emergent effects between them are what makes it powerful. Between the presumably more advanced flying required to execute those combos and synergies well, and the basic fact that the squad only has two ships, I’d be inclined to believe that it is not beginner friendly. Similar but less extreme goes for the Omicron+Soontir+Inquisitor setup that won this year’s US Nationals; simple baseline stats aren’t what carried the day there.
Next we see some quantification of why TIE swarms have traditionally been so strong, they’re at or near the top across all stats. Notably, with 6x ships they’re meeting or near my durability criteria on pure hull points, and then also have high agility. The number of baseline shots that could be theoretically applied is also very good. However, that’s the rub: With so many ships it’s difficult to bring them all to bear and in general to fly effectively, so these are not ideal first lists despite their innate strengths.
On the flip side, we see quantified evidence here of one reason why 3x X-Wings of either generation or of the closely similar E-Wing and Z-95 are not super popular: They’re lacking across the board on these baseline stats. So for the squad to work the pilots or upgrades must be pretty good, and that’s what we see on the tabletop. Comparatively few X-Wing pilots from the large pool of them see much serious play, and usually combined with other ship types, such as Biggs flying escort. Again, we’re focused here on beginner lists that are comparatively simple to design and fly effectively. So this is not to say that the several kinds of common Rebel regeneration lists are not strong. But their middling baseline stats, visible here as the white band across the table, indicates that they may be more challenging for less experienced pilots as they put more emphasis on special effects and flying skill.
Looking at a final pair of existing popular lists, it’s clear why the BBBB and BBBBZ squads work: They have great durability with very high hull point+shield counts, and they pack a wallop to match through very high native firepower. The big red flag from these stats though is that the BBBBZ list might be a bit unwieldy for less experienced players who might find it tough to use all five ships optimally and recoup their points. That said, both are fairly simple lists that use few (BBBB) or no (BBBBZ) special effects. They’re well in line with the durability, firepower, and simplicity rubric proposed here.
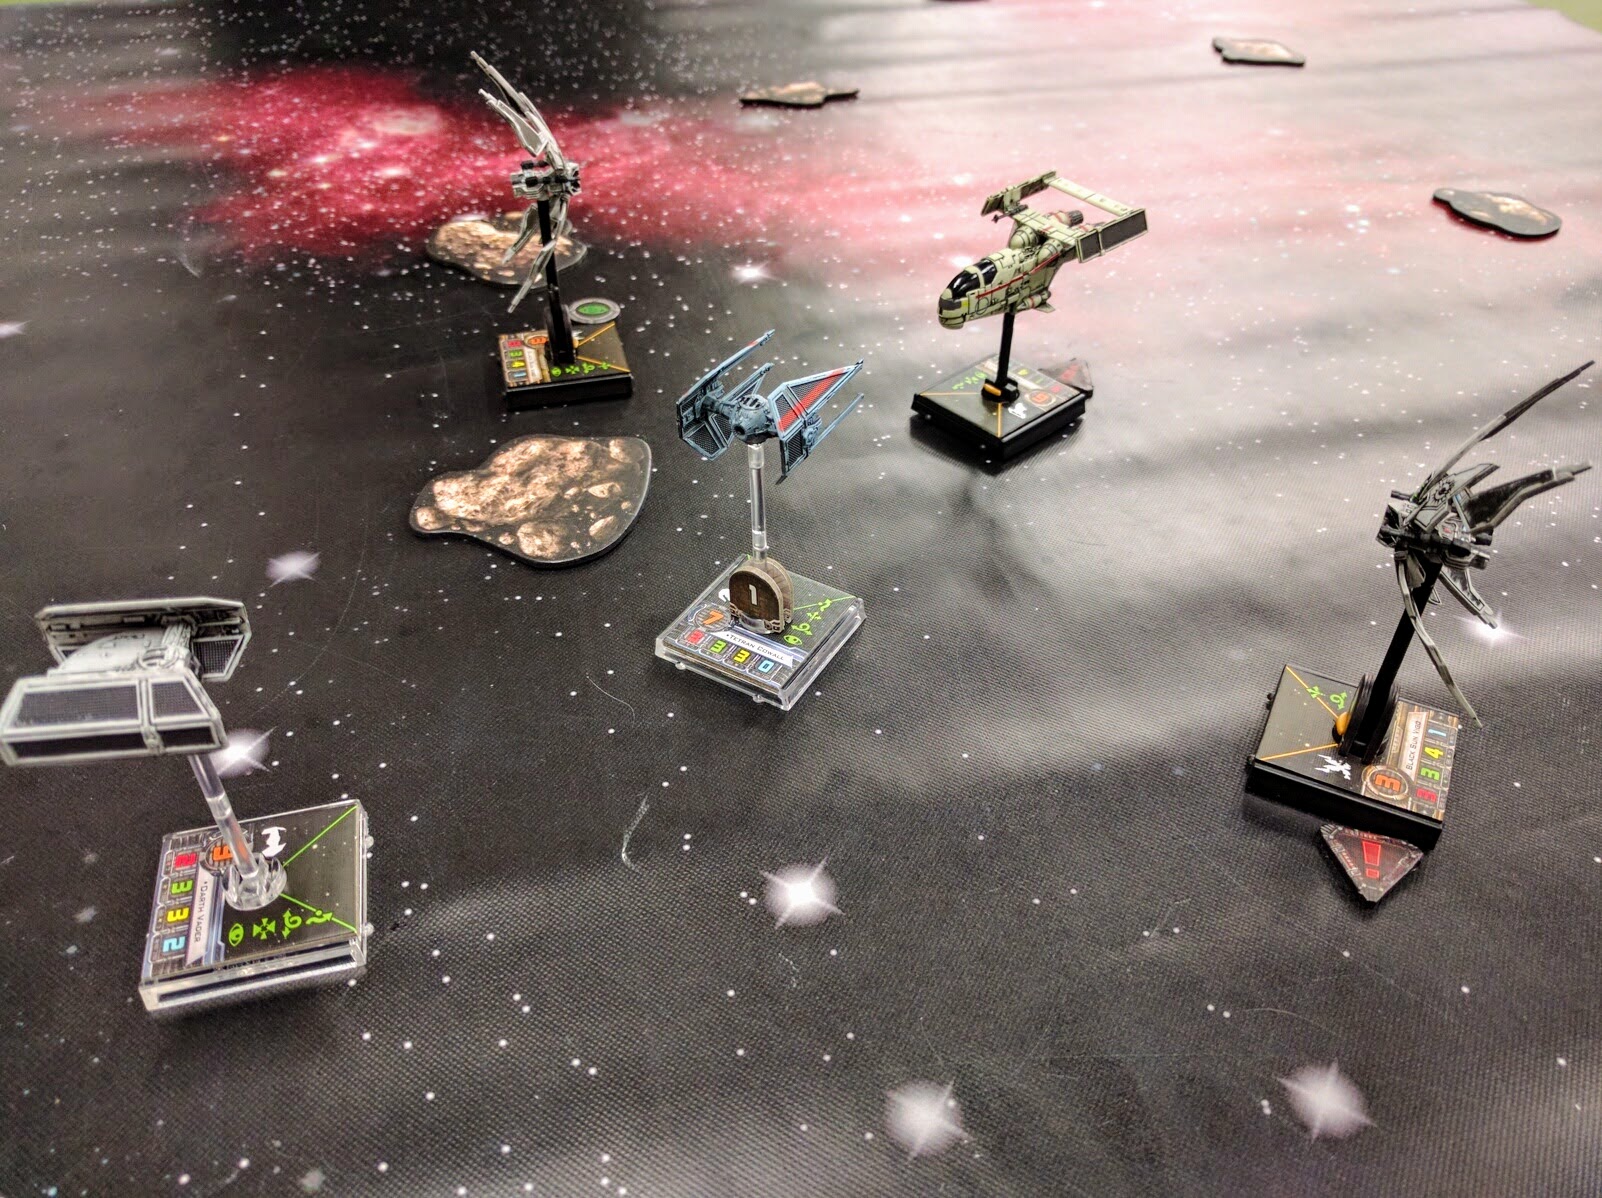
Darth Vader and one of his aces are ambushed by Scum pirates. These lists… do not meet any criteria whatsoever.
Evaluation
These simple measures and threshold metrics seem to match up well against this sampling of squads and intuitions about what makes them work. We can therefore use them to help evaluate in a simple but quantified way how well my personal lists and the initial beginner lists I recommend above meet my squad design rubric.
Chewie
As expected, my early YT-1300 + 2x Y-Wings list shows a strong focus on basic durability. Attacks are a bit low, but that belies the upgrades: Each Y-Wing has a Twin Laser Turret secondary, giving them reliably better expected damage than the baseline.
Bees
My later 3x B-Wings formation + HWK-290 support shows similar durability (and a hull upgrade is not included here) as well as solid raw firepower.
More recently I’ve swapped focus passing from the HWK-290 for shared target locks and stress removal from an ARC-170 flight leader in Bey’s Bees, my current main list:
- Bey’s Bees
- ARC-170: Shara Bey w/ Wingman, R4-D6, Weapons Engineer, Alliance Overhaul
- B-Wing: Blue Squadron Pilot
- B-Wing: Blue Squadron Pilot
- B-Wing: Blue Squadron Pilot
That list is very durabile, 33 hull points & shields is a lot to chew through even though agility is inferior. Baseline firepower is also very good, especially once you factor in that the 0pt Alliance Overhaul title upgrades the ARC-170 to 3 attack dice in the front arc, raising the squadron to 12. Both measures are thus well above the target numbers.
In fact, those stats are very similar to or in some places better than the popular BBBB and BBBBZ lists, which are ubiquitously cited online as the go-to squads for effective B-Wings. That says the Bey’s Bees list is essentially a drop-in replacement in terms of basic durability and firepower. From there you get into a more complicated discussion. The Bey’s Beys formulation brings one pilot with 3 red dice at a much higher pilot skill, 2x target locks sharing, some squad stress removal, an extra hull point versus BBBB, an astromech shielding one ship from high damage, and some auxiliary rear arc protection and flexibility. Is that better than Fire Control Systems, Advanced Sensors, and variations of one 2pt upgrade in the BBBB setup? I think it’s at least comparable.
In comparing to BBBBZ the tradeoffs are more clear. The latter has a good bit more hull points+shields. But a primary limitation of the B-Wings is that they can make really good initial contact runs, but then their red 1-hards and Ks make it tough for them to leverage their high firepower and shoot effectively as a close fought dogfight continues. BBBBZ doesn’t have any mechanism mitigating that, whereas the supporting ARC-170 brings some measure of that plus similar firepower. The latter’s rear arc shooting also supplies some of the capabilities that extra Z-95 brings, somewhat protecting the rear of the formation as it maneuvers. Further, that extra Z-95 is a relatively easy giveaway in tournament settings where every point lost matters. Most importantly though, I think many players will have more trouble flying the five ships optimally, so packing similar capabilities into four ships is a good idea.
Long story short, I’m not saying that my Bey’s Bees list is definitely “better” than BBBB and BBBBZ. But there is a solid argument following the rubric and supported by the metrics presented here that it’s at least very comparable and might work better for many people. That’s an exciting outcome for a squad that started by just saying “I want to fly my favorite Star Wars ships, how can I make them work?” It also matches up with my local experience, where among a reasonable number of opponents it’s only been defeated by experienced players fielding triple Defenders and Manaroo HLC Scyk Mindlink. If you like B-Wings and ARC-170s, you should give it a try.
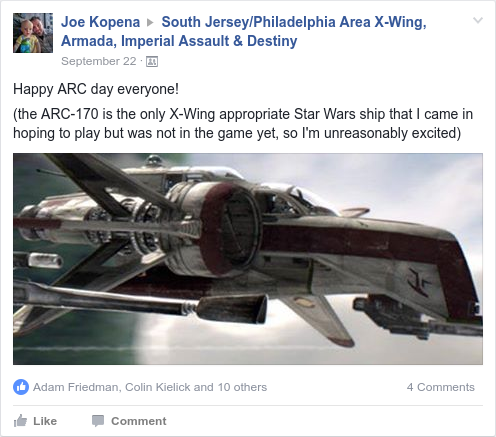
I am very, very excited about B-Wings, the HWK-290, and the ARC-170, my favorite Star Wars ships, and was very pumped when the latter was finally released.
Beginners
Finally, we can use the metrics to look objectively at my two beginner recommendations. First of all, both are within the squad size band. Durability at 25 hull points and shields is good on the Rebel YT-1300 list, and very good on the Imperial Decimator list at 28. The latter as a bonus also has above average agility, and the YT-1300 list is also just a bit better than inferior on defense. Firepower on both at 9 dice is just below my heavy firepower target but not unreasonably so, especially when you account for a third of that shooting being from turrets.
Combined with having comparatively straightforward but useful special effects, these numbers support my suggestion that these lists meet my durability, firepower, and simplicity rubric and are credible squads for beginners to start off with. They’re not necessarily competitive, certainly not “net lists” with which to go auto-win a tournament. But they’re robust enough to keep you in the game against more experienced opponents and to put out some damage of your own. They’re dollars-efficient ways to field solid 100pt lists that will perform well in casual play, are fun to fly, and include several mechanics and game aspects that will be good to learn.
Conclusion
Beyond the particular list recommendations, I hope beginners take away from this discussion a specific, reasonable guide to constructing some initial lists for yourself. I also want to emphasize that thinking about such frameworks is itself a useful meta-strategy skill. Good squadrons aren’t just random collections of neat abilities. They work toward a specific purpose and implement particular strategic design goals. My goals are usually based around basic durability, firepower, and simplicity. There are innumerable other viable overarching approaches, but as you learn you should try to explicitly identify which ones interest you and seem powerful, and consciously work toward executing them. In addition, I hope other B-Wing fans give the Bey’s Bees squadron a try and let me know how it goes. Good luck to all!
Shara Bey guides a formation of B-Wings toward obliterating Fenn Rau.
Addendum
Update: Just saw a post about a squad that won the recent Austin regionals. It’s notable in this discussion because it’s like a Scum melding of Bey’s Bees, BBBB, and BBBBZ, and seems very powerful:
- Austin Scum
- Z-95: Kaa’To Leeachos w/ Attanni Mindlink, XX-23 S-Thread Tracers, Guidance Chips
- G-1A: Gand Findsman w/ Attanni Mindlink, Mist Hunter, Tractor Beam
- G-1A: Gand Findsman w/ Attanni Mindlink, Fire Control System
- G-1A: Gand Findsman w/ Attanni Mindlink, Fire Control System
For those unfamiliar, the G-1A Starfighter (Mist Hunter) is essentially a Scum B-Wing. They have extremely similar stats and dials. So this squad is clocking in at 4 ships, 28 hull points + shields, 5 agility/1.2 average agility, 11 firepower. Stat-wise this is firmly in line with the kinds of lists I’ve been talking about here. The special effects are also similar to the B-Wing lists discussed. Of course the two Fire Control Systems is the core of BBBB, and the Z-95 echoes BBBBZ but although really only superficially.
The “one trick” though is generating and sharing focus and evade tokens, similar to my HWK-290 and ARC-170 supported lists. When any ship with Attanni Mindlink receives a focus or stress token, all the mindlinked ships also get a token if they don’t have one. Leeachos can steal focus and evade tokens from friendly ships. He does not himself have an evade action, but the G-1As do. So, e.g., the Findsmans can all evade and get those tokens for themselves while Leeachos focuses and through the Mindlink generates those tokens as well for all of the G-1As. If necessary he can then also steal an evade from one of them. Alternatively, one ship can generate focus for everybody with an action through the mindlink, and then they all also take focus actions and thus wind up with two focus tokens. Leeachos could even wind up with 3 focus tokens if he additionally stole one, though that seems only very situationally useful. Meanwhile the two G-1As with Fire Control Systems are also automatically maintaining target locks for free every time they make an attack. So this is a durable, high firepower squad with a fairly straightforward “trick” and couple simple buffs that wind up continually refreshing the squad with a slew of tokens to modify their shots and amplify that durability and firepower with a lot of reliable shooting and bolstered defense.
A little while ago I considered working on a Scum version of my B-Wing lists because I like the G-1A model, but I did not and this list has beaten me to the punch. Neat stuff!